Welcome

Welcome to my external memory and information on what I'm currently working on. Here you will find snippets of code, tricks and solutions I, or maybe you, may need to reference.

Feel free to comment your suggestions and any constructive criticisms that you may have.

Tuesday, 28 January 2014

Learning Unity 01.1: Source Code

Bitbucket

Why keep your source on Bitbucket and not GitHub you might ask. Well that answer is simple; GitHub is a little bit greedy and requires you to pay for private repositories even if you aren't a corporate user. Bitbucket does not and has all the same functionality as GitHub so I keep all my repositories there.

Where?

You can access the Git repository here:
https://bitbucket.org/bbertrim/unity-strategy-game-development/

The code still hasn't been completely cleaned up but it is in a working state. I plan on finishing up my clean up tomorrow and tagging it to match the "Learning Unity 01" post. I will be updating the post with a link to that tag and links to specific files within. I might throw a few screen shots in for flavor as well.

Sunday, 26 January 2014

Learning Unity 01: Unit Selection

Overview

I'm going to talk about the clicking feature I just implemented using Unity as the first step in creating my game. Also code will be made available on my bitbucket account as soon as I get it cleaned up and this project under version control.

[UPDATE]
The source code has been pushed and tagged. You can find the relevant code to this post at: My Bitbucket Repository.

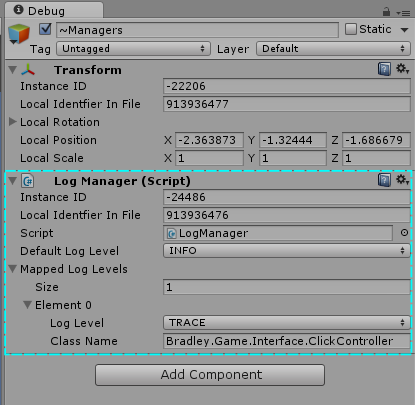
I've also went back through the post and linked to code and added a screen shot of my Logging Manager.

The Design

The Common Approach

Generally the process for capturing clicks and selecting units is described in the following Sequence Diagram (Note: Yes it is not proper UML but you'll get the idea and I've also included some custom annotations):
Sequence Diagram of a Common Selection Implementation
Figure 1: Common Selection Implementation 

Classes we need to code:

  • ClickController:
    • This class inherits from MonoBehaviour. This allows it to make use of the base class's Start, Update, Awake, OnEventMethods, etc. methods which tie us into the main process loop and events in the game. See its scripting reference.
    • Note that Unity does not allow us to instantiate any class extending MonoBehaviour in code. We have to attach them to GameObjects and Unity will handle their initialization. So to keep things simple I would suggest you create a single empty game object to hold all of your instanced MonoBehaviour classes (I call mine ~InstanceManager). This way you don't have scripts attached to random objects (such as your main camera) just because you have to in order to use it.
  • UnitManager: 
    • The UnitManager is created using a singleton design pattern so that we don't have to initialize it ourselves and that there is only ever one instance. (See Wikipedia: Singleton Pattern).
  • Unit
    • This is the MonoBehaviour that will be attached to all of our units. This allows us to add additional capabilities (via methods) and properties (via members) to the Unit such as movement, speed, hitpoints, etc. 

Following the sequence

  1. The user first clicks some where on the screen. The click controller is watching the input on the mouse button and if it is clicked ever clicked...
  2. It uses Unity's SendMessage capabilities to...
  3. Call a handler defined in the Unit class (LeftMouseButton())
  4. The LeftMouseButton method gets and instance of the UnitManager
  5. Calls the SelectUnit method on the instance which adds the unit to a list of selected units

Thoughts

Although the concept behind the process is sound I do find that this approach has a few flaws:
  1. It's does not Separate Concerns well.
    • In order to make project organized, scalable, modular and maintainable having good Separation of Concerns is crucial.
    • When implementing future features, such as multi-select, deselection, group move commands, patrol commands the code will be messy and you'll have to hunt for where exactly a specific feature is implemented since it could be the Unit handling it or the UnitManager.
  2. Performance
    • This method uses the unit it self to pass along the message that it was clicked and is called using a message system instead of a direct call. The compiler may be smart enough to see the 1:1 mapping to another call in the Unit but the use of a SendMessage method is worrisome. Since them method name is passed as a string Reflection will have to be used which is very expensive.
    • (Ties into the Separation of Concerns issue) why does the Unit have to be involved with the selection process? All a unit should be doing is unit-esq stuff such as moving, shooting an dying. It's the responsibility of the unit manage to manage the units so don't waste the CPU cycles calling the unit or confusion of code location.
  3. Potential for duplication of code
    • More then just units will be clicked on and not just units will move so why not have a base type to implement the shared features and just extend it.
  4. Coupling between the Unity Engine and User code.
    • To make code more readable and, even though it's moot in this case, more modular between platforms. An abstraction layer should be at least partially implemented which maps unity and system methods/properties (such as buttons and keycodes) to actions. You should never see methods named LeftClick() or references to KeyCode outside of the mapping or interactions directly with Unity.
  5. Magic Numbers
    • Although its not shown in the diagram I found an excessive use of constants inside the code, specially with mouse buttons (0=left, 1=right, 2=middle).

My Approach

Magic Numbers and Mapping

I defined two enumerated types to deal with the magic number issues as well as for mapping purposes:
  • MouseButton
    • Values: Left, Right, Middle
  • Action - Maps actions to mouse buttons
    • Values: Select, Interact, Manipulate
Explanation: To begin with the user is going to be able to do three things with units: Select them, Interact with them, and Manipulate them. Now using a mapping method I can define what mouse click will execute which action.

You can see how I handle the mapping in my UnitManager.cs file. The main entry point is at the ClickNotification() method. Following the logic there you can see how the mapping is done with the enumerations which occurs in the MapMouseButtonToActionHandler() method.

Logging

Figure 2: Log Manager Script in the Inspector
Coming from a Java background I found that the lack of logging flexibility within Unity a little frustrating. Specifically adjusting log levels for specific classes. So I wrapped the Unity logger inside my own logging class and am adding this functionality to it.

Figure 3 to the right my Log Manager script attached to my ~Managers object. This allows me to adjust the default log level at run time as well as turn logging on and off for specific classes.

Base Mobile class

Any object that acts like a mobile (can moved, die, etc...) will be derived from this class. Currently this has no impact but will be utilized when I add unit movement.

New Sequence Diagram

My Select Implantation
Figure 3: My Select Implantation
You'll notice that work is being confined to the UnitManager and the ClickController is just notifying the UnitManager that a click occurs and passes along all pertinent information such as the GameObject clicked, location in global space and any key modifiers pressed. Then it's the UnitManager's responsibility to do what it needs to do. This time it checks its mapping for the mouse button pressed (which maps to select) and calls the SelectActionHandler which in turn decides that we're selecting a unit and calls SelectUnit.

At this point I have multi-select, individual selection and deselection and single selection working. But for all of these you'll note that the additional functionality doesn't change the sequence of events, only the actions called at the end. For instance if you are holding Ctrl and click a selected unit the SelectionActionHandler would call DeselectUnit instead of SelectUnit.

Next Steps

Get my code under version control and share it! Then I plan to implement movement and box selections.

Saturday, 25 January 2014

Learning Unity 00: Introduction

What is Unity?

Unity is a game engine and development platform. It comes bundled with Mono Develop as a programming IDE. It has a pretty small learning curve to the point where even those with little to no programming experience can build something with it.

Why learn it?

Well I've had the desire to create a game for 10 or more years now. It all started with Ultima Online and a RunUO powered shard. It was my first taste of crafting a world with programming and I never forgot it. RunUO is a reverse engineered server implementation for Ultima Online which is written in C# and is very easy to modify and extend . Topping that off I have a background in art and I like to write/read fantasy/sci-fi. But most importantly; I'm a programmer with 6 years of training (two diplomas, one in Computer Engineering & Software Development and the other for Computer Analyst) and 4 years of professional experience.

Why Unity?

Mainly because it's free and all the hard work is done for you leaving the fun stuff for me to do. And since the engine it self is maintained by a third party I don't have to support it. I've also looked into other possibilities:

  • OGRE: I used it for a week until I decided it wasn't worth the effort. OGRE is a pretty good rendering engine but you have to create the rest of the game engine yourself and frankly I don't have that much free time.
  • Unreal Engine: Was my second look and I was intrigued but then this project faded from view for a while and I never really gave it too much of a try.
  • Unity: Where I work, Queen's University, they offer a Game Design course in Computer Science. We had a student do placement in my office and he told me about Unity and I was intrigued. I got back into the game design mood and did a lot of research on Unity and there is a lot of documentation to be found and its very easy to get into. My real enjoyment of it came from its scripting which is done in C#, javascript or boo (of course being a java developer and having a lot of experience with C# I chose C#). The scripting in Unity is great, there are absolutely no limits in what you can do and a lot can be done in a very short amount of time.
  • Unreal Engine: This time I took a more serious look at the Unreal Development Kit (UDK) and based on videos and content coming from Epic it's the next Holy Grail. To be honest; the Videos Epic put out showing off its features are mouth watering. However my first twinge of doubt was when they showed off their Kismet Visual Scripting System. Don't get me wrong its pretty damn neat, however, I keep thinking why? When you're writing code you visualize this data in a similar way in your head and can write it 10 times faster then point and clicking in a GUI then connecting inputs and output with a bezier. In the end I came to the conclusion that UDK may be able to generate a prettier game but Unity is just going to be more fun developing in and I feel a lot more flexible with what I can create.
  • Cryengine: All I can say is, “Beautiful”. This engine is absolutely stunning. However it's meant for a 1st/3rd person game and in my initial dive into the game development world I am intending to make a RTS/TBS game. From the examples and videos of RTS games created using Cryengine it just seems to be lacking. Sure the visuals still look nice but it's still, in essence, a first or third person game looking straight down.

Other Plans

I had played around with the idea of doing a video series on Youtube of the development process however I'm not sure who would bother watching it and as such wouldn't be worth the effort. However, if people do end up following this blog and they seem interested I may change my mind.

What's Next?

My first goal is to come up with basic unit selection, management and movement. My next post will detail my design and go over my implementation and my reasons why I did what I did.

Hibernate configuration and setup in a web applications

Overview

The steps are: create a Hibernate configuration file, create a SessionFactory with it and get a Session.
This is usually done during the loading of the web application context so that database verification/update/creation will be done upon the application's deployment instead of on first use.

Hibernate.cfg.xml

This file defines your data source, entities and configuration. This file “should” be placed in your application's root build path for ease of setup. However, if you have need to, it can be placed anywhere within you application's build path. I would recommend you keep it in the root of your build path unless you have a reason not to as you will need to reference the path when creating your SessionFactory. Below are a couple examples of a Hibernate.cfg.xml file.
For connecting directly to the database:
For connecting to a data pool managed by the application server:
Note: You'll notice that we're using “thread” as our session context class. This is the recommended way of using Hibernate within web applications. This means that we are going to have our session attach to the current running thread instead of managing it our self within the servlet life cycle. The implication is that when we use sessionFactory.getCurrentSession() we are getting the session attached to the thread which will automatically close when we do a commit or role back of a transaction. Since a standard unit of work maps well to the lifecycle of a servlet this works very well. We can call the sessionFactory via our singleton in HibernateUtil (see next session for more information) at any time to get the current session to do work without the need of passing it around. You will notice that I do pass the session object around in my examples and I don't really need to. However, I started off doing it that and I'd prefer to just stay consistent (and not have to update my prefab classes). Perhaps next time I have a big project I will redo my prefab method signatures and remove it.

HibernateUtil

The standard practice for interacting with a Hibernate Session is to have the a utility class keep the SessionFactory as a singleton.
In my case I chose to have the Singleton initialized within a static code block so that it will be instantiated when the class is loaded (which should be when you deploy the application). However, since this may differ from application server to application server I will also create a listener that will be called when the application context is registered. I know the listener makes the static code block initialization for the singleton moot but I like the non-standard singleton design pattern.
You'll also note the joinTransaction() helper method at the end. I find I don't often use a framework that does transaction management since I don't often write large applications and prefer a lighter, or no, framework. This method allows me to chain methods calls together to avoid duplicate code without the need of worrying if there is an existing transaction. Below is an example of how I use this method:
You'll notice that each utility method can be called on its own and complete its task but also methods that require another utility method can use them and the wont execute a commit if they weren't the method that was first called. This can be taken a step further if you have a more complex business layer which could manage the transaction it self.

HibernateListener

Next we create our HibernateListener class. This class is responsible for getting the session factory when the Context is initialized and closing it when the context is destroyed.

Sources

https://community.jboss.org/wiki/Sessionsandtransactions

Friday, 24 January 2014

Tomcat connection pools and Hibernate

Overview

Tomcat accomplishes connections pooling by defining a resource for a given context. Then that resource is referenced within a web application's web.xml which will cause the Tomcat Resource Factory to create the requested resource and it will be accessible to that web application.

Defining Resources

Resources can be defined in either of the following locations:

Global Context

tomcat/conf/context.xml
All resources defined here can be referenced in any web application.

Context Specific

tomcat/conf/[enginename]/[hostname]/[appcontext].xml
[enginename] This will be Catalina
[hostname] This will usually be localhost
[appcontext] This will be the directory name the application is deployed to under the tomcat/webapp directory.

Following the above directory structure and naming convention allows you define a context and resource that can only be accessed by a specific application. An example would be of this would be tomcat/Catalina/localhost/MyExampleApp.xml

Below is an example of context.xml with a resource defined within. You can also take this example and remove WatchedResource element and use it for a context specific resource.


Web Application Setup

To allow access to the resource you must make a reference to it in your applications web.xml

Hibernate Setup

To configure hibernate to use the resource you reference it using its full JNDI name in the <property name="hibernate.connection.datasource"> tag

Sources:

http://wiki.apache.org/tomcat/TomcatHibernate
http://tomcat.apache.org/tomcat-7.0-doc/jndi-resources-howto.html
http://tomcat.apache.org/tomcat-7.0-doc/jndi-datasource-examples-howto.html